The new DC feature, installed in Color Perfect since version 3, is dedicated to color negatives reproduced with a digital camera.
If I understand correctly, as with PerfectRAW, DC recognizes the camera that reproduced the film and adjusts the parameters for that camera. This allows for better and more precise adjustment of the base curve, the color integrity of the sensor, and consequently an optimal starting point, further optimized compared to the previous method.
In fact, it's not that the previous method couldn't achieve good results from color negative reproductions with a digital camera, but it required more work; in my opinion, it wasn't very easy. With DC, it's a whole different story; the file is immediately better balanced, and above all, it offers greater flexibility, resulting in easier optimization. Potentially, you can achieve the same result as a photochemical print—impressive.
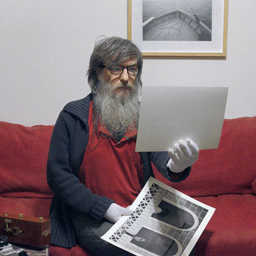
I performed the test on a photograph with mixed light temperatures; Ambient tungsten light with a relatively warm cast, flash combined with ambient light—that is, exposure for ambient light, plus fill flash—and finally, the light from the lighter illuminating the hands and slightly the face.
Perhaps not a highly complex situation, but I think it's a good one for the test; those who process digital negatives know that different light temperatures can be difficult to manage all at once in the same frame; if you tend to eliminate the tungsten light cast, then where the flash is, you risk having too much blue, and vice versa, if you tend to balance the cool light from the flash, then the ambient light can appear too yellow.
Sometimes, in balancing the light temperature, the colors lose their integrity, taking on hues that aren't exactly natural, or even pleasant.
In my opinion, in this example, I managed to balance the light temperature fairly well, favoring the cool light of the flash a little more than the warm light of the tungsten.
A personal choice; the opposite could have been done.
What I would like to point out, however, is the quality and integrity of the color, which is not something you can take for granted with a digitized negative.
Thanks to the consistency and credibility of the color, given its integrity and naturalness, you can appreciate all the nuances and hues in the areas with different light temperatures.
We have a subject directly illuminated by the flash, which tends to take on a cool tone, but in less direct areas, it retains an almost natural skin tone, even retaining the natural redness of the skin with hints of yellow/orange from the lighter flame.
In the left background, the white flags are a mix of cold flash light and ambient tungsten light, warm and cold, with a predominance of cold, as the latter, being at a useful distance, are still below the flash beam.
As we move to the right, losing the useful flash beam, the light temperature becomes increasingly warmer, until we reach the window, where we can glimpse the warm cast of the tungsten.
I say glimpse, because it has been deliberately neutralized, but it is still present.
As I said before, the opposite could have been done: leaving more yellow to preserve the ambient light of the tungsten, thus further neutralizing the cold temperature of the flash.
The result in terms of color quality doesn't change; it's just a matter of interpretation.
Personally, I preferred to go this route for two reasons; the first is that, in my opinion, I see the neutrality of a color as tending more toward cold, rather than toward warm. I understand that neutral means neutral, but to me, neutral resembles cold rather than warm.
The second reason is because, above all, I'm interested in the subject, and I find these colors on the skin, which include blue, pink, red, yellow, and orange, to be at the right point to enhance them all simultaneously. The hands and face express the full chromatic strength of this image. I wouldn't have had the same impression with a higher level of yellow.
The negative in question is a Perutz Primera 400 ISO film, which is also expired, although the fact that it's expired doesn't really mean much.
So, although it looks like a film with some Agfa formula, it has nothing professional about it; it's just a common amateur film.
In ColorNEG, I opted for the Kodak Gold film profile (GA 100-6) because, in this case, it seemed like the best starting point. I was pretty quick in my choice. Perhaps, with more thorough research, I could have identified some Agfa film, but I'm still very satisfied.
Well, it may not be perfect, but I've never before achieved a result like this from a color negative reproduced by a digital camera.
What I'm seeing looks like the same thing you can get from a photochemical print, maybe even better.
First test of the DC function
-
robyferrero
- ColorPerfect User
- Posts: 175
- Joined: Wed Aug 20, 2025 4:12 pm
- Location: Italia
- Attachments
-
-
- 2006-negative-perutz_400-roby_ferrero.jpg (125 KiB) Viewed 789 times
- [Full image link - opens in new tab]
-
-
-
- 2006-positive-perutz_400-roby_ferrero.jpg (170.88 KiB) Viewed 789 times
- [Full image link - opens in new tab]
-
-
-
- 2006-perutz_400-colorNEG_DC-roby_ferrero.jpg (320 KiB) Viewed 790 times
- [Full image link - opens in new tab]
-
Last edited by robyferrero on Fri Sep 05, 2025 4:07 pm, edited 2 times in total.
-
C.Oldendorf
- Developer
- Posts: 212
- Joined: Fri Sep 02, 2022 10:31 am
- Contact:
Thank you very much for sharing this detailed write-up and example. It’s nice to see how you balanced flash, tungsten, and even the lighter flame, with the colors holding together naturally.
Small technical note: mixed-light fine-tuning (CC Ref + ganged slider)
I use this a lot and it may not be immediately obvious that one can:
Small technical note: mixed-light fine-tuning (CC Ref + ganged slider)
I use this a lot and it may not be immediately obvious that one can:
- Make one light source neutral while accepting the maximum cast from the other.
- Press the CC Ref button to set a new 0/0 reference point (as a CC filter pack).
- Now neutralize the opposite light source — you’ll see a significant numerical change in the CC filter pack.
- Click the R, G, or B box with the highest value, hold Shift, and move the slider. This gangs R G B CC filters so that you can travel along the same correction trajectory — anywhere between (or beyond) the two endpoints.
- If needed, refine using the FilmType / SubType / FilmGamma system: www.colorperfect.com/filmtype_subtype.html?lang=en
- This is intended primarily as a per-roll adjustment (not per image), except for sheet film
 .
.
-
robyferrero
- ColorPerfect User
- Posts: 175
- Joined: Wed Aug 20, 2025 4:12 pm
- Location: Italia
Thank you so much for your valuable suggestions.
I'll also try the CC Ref solution.
Today I read the information about "Film Type Starting Point"
I got to work right away and achieved a decent, if not good, result.
I wanted to start a new topic with the results of a color negative scan using the suggestions provided in this link, and of course I wanted to post the same link.
But you posted the link yourself
Well, I'll go to the scanning forum anyway and post the photo, and for the convenience of us users, I'll repost the link in question.
-
C.Oldendorf
- Developer
- Posts: 212
- Joined: Fri Sep 02, 2022 10:31 am
- Contact:
I just thought of our discussion of SmartClip for digital images. When we compare color-negative film to digital capture, there are two fundamental differences worth keeping in mind.
First: Film does not record RGB directly. It stores weighted spectral averages as dye densities in CMY layers — not CMYK, but “not-red,” “not-green,” and “not-blue.” That filtering + dye chemistry gives each stock its own characteristic color rendition.
Second — latitude, latitude, latitude: With characteristic curves well below gamma 1.0, color-negative film captures far more brightness range than you can normally print as a positive. Each channel can respond differently, but those discrepancies are correctable in C-printing or — more flexibly — in ColorPerfect. Practically, this yields a very forgiving shoulder where digital sensors would clip.
That’s why Roberto’s portrait with the lighter flame stood out to me after the SmartClip discussion: On digital the blue/yellow/orange components of the flame would potentially blow out without exposure compensation; on film the latitude preserves them. It’s a subtle survival of color detail most viewers won’t notice at first glance — but it’s one of the things that make the image special.
-
robyferrero
- ColorPerfect User
- Posts: 175
- Joined: Wed Aug 20, 2025 4:12 pm
- Location: Italia
It's precisely thanks to the very low gamma of negative film that it achieves much greater exposure latitude than positive film, not to mention the dynamic range of digital.
In fact, as a total incompetent, I've always wondered if it would ever be possible to create digital negative sensors, reproducing negative film, so dense as to exploit all the negative film's best characteristics.
But the issue is undoubtedly more complex; the point is that it's a completely different technology. If they haven't done it, I imagine it means it's not possible.
I mean, if such a thing could be done, reproducing negative film digitally, it would have been the perfect digital.
Very nice portrait, I like the cinema-like lightening.
- Attachments
-
-
- 2006-negative-perutz_400-roby_ferrero_ngt.jpg (88.36 KiB) Viewed 174 times
- [Full image link - opens in new tab]
-